Pages

Wednesday, April 28, 2010

Mini Card

This is a little card I made from a hÄnglar & stÄnglar image that I received in a swap. I am waiting for the day when these stamps will be available here in the USA!
This is more Copics work for me, and I adore these markers! I have used an off-cut from a 5 1/2-inch square card (cut from 8 1/2 x 11-inch card stock). There is a pretty floral background paper edged with some eyelet lace punching (MS). I used some leftover letter stickers from a scrapbooking project for the outside sentiment. This whole thing is layered onto pink card stock.

Check out the inside:
I've used 2 small strips from the floral paper, punched 2 small daisies from the pink, added blue centers, and stamped the sentiment (SU!) onto blue card. Simple, but an extra surprise when you open the card!
I use these cards when I have a present for someone, or I might use them when I am making a gift of something baked. It dresses up the package better than a bow!

Tuesday, April 27, 2010

Edwin Searching

So, if you are here hoping to see my next Copic adventure, I am afraid you will be disappointed. In my excitement to mail off my recipe cards, I mailed the package without taking a picture of the bookmark! Oh well! Instead, today I have a challenge card to share. Edwin was begging to be used!

The challenges that are included are:
Just Magnolia--anything goes
Cute Card Thursday--Sketch 109 (see below)
Magnolia Down Under--charms
Stamp Something--charms
Paper Play--no patterned paper
Colour Create Challenge--burnt orange, black and cream

[Andrea's Sketch]

Edwin, miniature butterflies/dots--Magnolia Stamps
Dragonfly, stripes--Stampin' Up!
Colored with Prismacolor pencils
One lonely "Search" charm that has been waiting for the right project!
Stickles
Brass star nail headsScrap of ribbon


Close-up of the charm

I hope you get a chance to check out these challenge blogs and have some fun making cards for one or more of them. For me, it is a great way to try new techniques, and I build up a stash of cards for different occasions.

Monday, April 26, 2010

Tilda and the Copics

Sounds like a rock band from the '60's, doesn't it?

I guess it has been a few days since I have posted a new Tilda...I have been busy making recipe cards for the swap that I signed up for on the Magnolia-licious group! It was a blast putting these together, and it is off to the post office first thing to send them on their way to Kay. I feel like a kid in a candy store waiting for the swap cards to arrive! Can you tell this is my first swap?
Anyway, my sweet hubby gave me a set of Copic markers after we returned from our Newport trip, and I wanted to get a little better at using them for the Tilda on the recipe cards. Here is one of my first attempts. The paper was all wrong, so things didn't go the greatest, but I made a little thank-you card using her. I didn't track which markers I used, but I will work on that for future postings.


Tilda and the Copic markers are from
the Magnolia-licious Store.
Sentiment is from SU.
Assorted flowers and brads, designer papers from my stash.

In my next post, I'll show you a little bookmark I made to thank Kay for hosting the swap...my coloring is getting better!

Thursday, April 22, 2010

The Pioneer Woman

Today I came across this wonderful blog/website, The Pioneer Woman. Written by Ree Drummond, this site is full of good food, humor and life. My little suburban life can't boast tales of calves' nuts, so I think I might have to live vicariously through the Pioneer Woman. She is married to Marlboro Man, or so she has nicknamed her cowboy husband. I'm not much for reality shows on TV, but this kind of reality is very comforting. At least I am assured of one other person out there in the world who marches to a different drummer.
Going to have to add another cookbook to my collection. The Pioneer Woman Cooks should apparently have a surgeon general warning label, but I think that means this is real food that sates the appetite. If the recipes on her website are any indication, I'm gonna love this book.

Wednesday, April 21, 2010

Happy Secretary's Day

To all secretaries and administrative professionals,
thanks for your work to keep us running smoothly. We appreciate all your efforts.


Here is the card I made for our office secretary. the large flower on front came from a little tutorial in the most recent Close to My Heart catalog that came this week,
using punched circles, folded to make the petals.

I even did the inside this time!


Monday, April 19, 2010

Paper Roses


So you will probably laugh at this post, but on our anniversary getaway, my husband and I went to this elegant little bed and breakfast inn in Newport, RI called the Hydrangea House. Upon entering our en suite bathroom, I found the toilet paper end rolled into an adorable little rose! It was such a delight! (They made one every time they cleaned our room!) So I de-constructed it to figure out how it was done. When we got home, I tried it out in our main floor bathroom. My 15-year old son was not as impressed as I had been!
I expect it will work in a similar fashion with a thin fabric, and maybe paper. I'm off to work now, but I'm going to play with it and see what I can do.
Thanks for visiting...hope I brought a smile to you today! Come again tomorrow!

Sunday, April 18, 2010

Windblown Tilda

April can be a very unpredictable month around here. I'm speaking weather-wise! We have had some days in the 70's and 80's, but this weekend it had been cold and rainy. Kind of reminded me of this Tilda image, so I thought I would share this card.

Done in a simple style, I colored Tilda with Prismacolor pencils, added a couple of rectangles of designer papers (don't know where they are from offhand!), and a little oval tag with a Hero Arts sentiment.

It will warm up again...as Mark Twain always said:
"If you don't like the weather in New England, just wait a few minutes."

Saturday, April 17, 2010

My Own Stamp

A couple of weeks ago, after seeing the adorable stamps that were for sale only in Australia to use on the back of my cards, I decided to design my own,
and have it custom made here in the USA.

This is what I came up with, using a .005 Micron pen,
and the type fonts from my computer:


The stamp is 1 inch x 2.5 inch.

Thanks so much to Simon Stamps in Massachusetts for the great job they did...and the stamp got here in just a couple of days.
(of course, they are pretty close by!)
The process was very easy, just made the drawing, scanned it into the computer, and uploaded the image by following the directions
when ordering the stamp.
I might even make some others one of these days!

Friday, April 16, 2010

Apple Angel Cake

Here is a recipe for a very simple and light cake that I would like to share. It is a variation of a recipe from a Weight Watchers meeting, so I wish I could give credit to the original recipe, but the person who shared the recipe didn't give the source. The difficult part is to not eat too much!

Apple Angel Cake

1 box angel food cake mix

1 can no-sugar-added apple pie filling

1 tsp cinnamon

1/2 tsp ground nutmeg

1 tsp vanilla extract

Preheat oven to 350 degrees.

In a large bowl, use a spoon and mix the dry powdered angel cake mix and cinnamon with the pie filling and the vanilla until completely blended. Spread evenly into an ungreased 9" x 13" pan. Sprinkle the nutmeg on top. Bake 30 minutes. Cool before cutting.

Makes 24 pieces (2 points per piece for Weight Watchers)

Enjoy!

Thursday, April 15, 2010

Tilda in Paris


Today I would like to share a thank you card I made for my friend, Julie, who has a day spa here in town called April in Paris. I treated myself to a facial the other day, and it left me feeling incredibly relaxed and my skin feeling younger and rejuvenated. I hope she enjoys the card as much as I enjoyed the pampering!

The image is "Paris Tilda" from the Magnolia-licious Store, and she is colored with Prismacolor pencils. There are 4 different designer papers, buttons from my stash, the Eiffel Tower stamp is by Art Impressions, and the "merci" is by A Muse Artstamps. I used an EK Argyle punch on the dark gray paper, and MS eyelet on cream paper. This is done using the sketch from the CLP Challenge for April. Edges were distressed and inked with "Black Soot."
The one thing I'm not too fond of is the paper that I used for the Tilda image...too much texture with the pencils.
Live and learn.
C'est la vie, as they say in Paris!

Wednesday, April 14, 2010

Tilda Warhol

Well friends, yesterday and today I have been working on something different for Tilda. It is a little "way out there," but I hope you will find it fun! I did make one other thing on Tuesday...I made my husband's hair shorter!

Anyway, you have to know Andy Warhol's pictures of Marilyn Monroe to understand this little parody. You can check that famous artwork HERE.

I had a little fun with art imitating art! This is "Berry Tilda" and scraps of cardstock.
Tilda is done with Prismacolor pencils. most of the images look right colorwise,
except for the far right one on the top row. She looks more green in real life.


Just felt like doing something totally unexpected with Tilda! Wonder if there is a stamp of her with her skirt blowing up...another Marilyn reference!

Tomorrow, Tilda hits Paris! Come away with me!

Monday, April 12, 2010

Day Dreams


What a beautiful day here in Connecticut! Before I head off to work, let me share a card I made for the Magnolia Down Under Challenge #41--"Old Days." The hardest part was coloring Tilda in shades of black, white, and gray! Whew! I used my Prismacolor pencils for "Jam Tilda."
The base for the card and the floral oval are from K & Co., Classic K Bailey. From Graphic 45 is the Daydreams paper ( Le Romantique Collection--"Daydreams") and the blue swirls is from the On the Boardwalk Collection--"She Sells Seashells." The pink eyelet is punched from Bazzills Basics. and the paper flowers were punched and inked, with buttons and pearls from around my stash.
Have a great day!

Sunday, April 11, 2010

Happy Hello!

I guess yesterday I was busy making a little cash at our tag sale, but is wasn't much! I also put together this card for a few challenges. Hope you like this lavender beauty!

Challenges:
Just Magnolia--Punches
Stamp Something--Stitching
Color Create--Lilac, gray and white
Paperplay--Shiny, happy people


Tilda is colored with Prismacolor pencils, and her pinafore is flooded with ultrafine glitter. the edges of the image are distressed with ink, as were the sentiment stamps. Both sentiments came from Stampin' Up!, and I used Martha Stewart punches.
Have a blessed day of rest!

Friday, April 9, 2010

More Blog Candy

I have been following Janiel's blog, and she is having a blogaversary! Please check out her blog by clicking on the link in the sidebar. Thanks for coming by here!

Thursday, April 8, 2010

Blog Candy Alert!

Magnolia Down Under has become Tickled Pink Stamps, and they are offering blog candy!
Please go check out their new blog and get in on the fun!

Baby Card


After getting some wonderful inspiration from my blogger friend at Cards2Cherish (Thanks Pat!), I found a design for my first Tilda baby card. It came from Hanna at Hannas Hobbyblogg, the very talented 13 year old from Sweden with the most beautiful blog and cards. Here is a link to her sketch---check out her gorgeous cards while you are there!

Most of my papers were scraps, or unidentifiable papers, but the key was PINK! I added a little butter yellow for accent--pink and yellow are such a cheery combination! The baby is done with Distress Ink and Prismacolor pencil accents. the ivory paper rose came from A.C. Moore, along with some buttons and trims from my stash. I did some stitching, and some distressing on the edges, and a little Stickles accents for a little sparkle! This card only took a couple of hours...some of the others take so much longer, but I love it! I have also entered this in the Cute Card Thursday Challenge, "Mono Mania!"

Some days I spend too much time on the computer, surfing from one lovely blog to the next, and seeing all the beautiful cards and catching some fun tutorials. I hope to share more of those with you in the coming days.
Enjoy your day!

Wednesday, April 7, 2010

Just Magnolia Week 49 Challenge

Last week, when the Just Magnolia Challenge was posted, I decided to google "card folding." I found a neat video here, and that is the basis for my card. You might want to watch the tutorial first, it will help you to understand all the folds in this unique card.

My husband Dan and I will be celebrating our 25th wedding anniversary on the 20th of this month, so I have been thinking a lot about weddings, brides and love! This card idea came to me immediately, and I was excited to use my new Bride and Groom stamp from Magnolia!

Here is the closed card. I stamped the letter "H" (for our last name) with a Top Boss embossing pad, and used silver embossing powder. The "H" is mounted on cream card stock.
("H" is from Close to My Heart)
Flip up the upper tab, open the card and you see the inside fold, onto which I mounted a "25" printed from the computer onto cream cardstock and distressed with black soot Distress Ink.

Open it all the way, and you see Tilda and Edwin!


The background paper that I chose for this card is by Moxxie, called "Engagement." It is a double-sided paper, though I used only the circle side.
The bride and groom are stamped onto a cold press watercolor paper that I have lying around the house. I stamped with Black Versafine ink, and this is my first attempt at coloring with Distress Ink. I added a little Prismacolor pencil enhancement, and used Stickles for Tilda's veil and Edwin's buttons. To mount, I cut around the finished image, and used foam mounting tape to attach it to a circle cut from the same water color paper. MS eyelet punch on white card, cut into segments and attached to the edge of the circle, adds a delicate scallop edge.


The sentiment, "forever and beyond," is inscribed in our wedding rings, so I thought it was so appropriate for this card; it is printed from the computer onto cream card, and mounted on a scrap of embossed silver paper. The flowers are from A.C. Moore, and I sponged a little ink on them, but it is hard to see.

Thanks for your visit! I hope you get a chance to try this folding technique for yourself.
Come back soon!

Tuesday, April 6, 2010

Sunset Salad Tilda

I suppose that is an odd name for a post, but I am sharing a recipe card for one of our favorite warm weather recipes, and it seems as though Tilda likes it too!


I am looking forward to participating in my first recipe card swap, so I thought I would try one ahead of time. "Sweet Tilda" from Magnolia-licious is colored in Prismacolor pencils. All the flowers except for the large white daisy are made with various punches I have, and the little flowers all have glitter centers. I typed the recipe in the computer...I used the "Beaches" font.
Yellow ribbon makes the bow, and the orange background papers are from the "Ambrosia" 6-inch square paper pad by Basic Grey.

Try out this recipe, especially if you want to get a little extra fruits and veggies into your kids!
My kids are all grown up, but they still love this salad.

Tomorrow, I am planning to share my Week 49- Just Magnolia card. Please come back and take a look! I really appreciate all your encouraging comments!

Monday, April 5, 2010

Roses are pink!


I hope everyone enjoyed the weekend. We were blessed with beautiful weather, and I had both my chicks home in the nest, so I was doubly blessed!

Today I am sharing a simple card I made, using a photo of some roses that I took back in February, and then altered in Photoshop Elements. I am a true probie when it comes to that program, but I was so happy with how this came out. I added a simple birthday sentiment from Stampin' Up!, and one of my dearest friends will find this in her mailbox for her April birthday!

Tomorrow look for a recipe card with a sweet Tilda! Hope to see you then!

Sunday, April 4, 2010

ALLELUIA!


This is the day the Lord has made; let us rejoice and be glad!

Friday, April 2, 2010

A Lenten Recipe


On the solemn occasion of Good Friday, I am sharing a traditional Italian recipe from my mother's family. They were originally from Naples. This is an Italian mac and cheese, which we would have during Lent. My family finds it a simple meal for this day.

Pastira

1-1/4 lbs perciatelli pasta or spaghetti, cooked (in the picture, I used perciatelli--it is a hollow sort of spaghetti)
6 eggs, beaten
1/2 cup milk
1 cup Parmesan cheese
8 oz. shredded mozzarella
1 lb. ricotta
1/4 tsp. black pepper

Combine all ingredients in a greased 9" x 13" casserole dish. Bake covered at 375 degrees F for 40 minute, then uncover and bake 10-20 minutes more. Cool 10 minutes, and cut into squares.
Also very good as a cold leftover.

Thursday, April 1, 2010

One Little Flower


Yesterday, I had a plan for today. Besides doing laundry and some cleaning, I was going to make bread and cookies for Easter. Card-making was supposed to happen if I could "sneak" it in.

I was just going to just make one little ribbon flower. Making that flower was going to be my post. Then I decided to make a little card with an off-cut that I had from cutting a 5 1/2" square card.

That turned into the whole morning!
It is so very relaxing to be in the zone, coloring, making a card. I hope you enjoy my efforts!
I have yet to do the baking...but the laundry is started!

Images: "Dragonfly Tilda" by Magnolia
"Ant" and sentiments by Stampin' Up
Assorted scraps of papers
3 mini brass brads
Iridescent Stickles
"Faded Burlap" Distress Ink
MS Punch--fern
Buttons

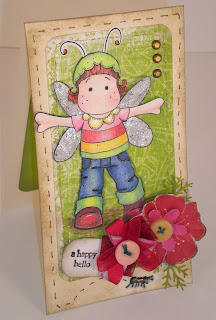
The card is a 3" by 11" off cut of cream card-stock, folded in half. The front edges of the card were sponged with the Distress Ink.
Tilda is colored with Prismacolor pencils, and her wings are accented with Stickles, after being colored with a silver pencil. I cut her out and layered her onto the card, after sewing on a green paper with rounded corners. I made 2 little flowers, the ribbon flower and a paper flower cut out of a sheet of paper called "Love Story" by Making Memories. I distressed the edge of the flower with scissors, crumpled it, and sponged the edges with Distress Ink.


I added the brad at the top, drew a dashed stitching line with a black thin-line marker, then added a little ant, popped out with foam tape for dimension. I added a little Stickles to him as well. I punched 2 fern branches to accent the flowers, and distressed them with ink. Next, a little "happy hello" tag is placed to the left of the flowers, and is popped with foam tape. (The color is a little off here...the flowers are more of a burgundy like in the first photo.)


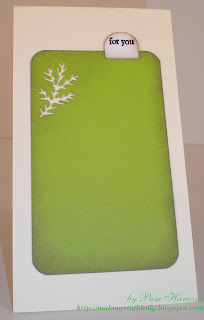
On the inside I added a green rectangle with rounded edges that I sponged with Distress Ink, and I punched a fern in the top left corner. I made a little "for you" tab for the top edge.


Here is a shot of the inside.


Now I have to get back to finishing my chores and doing that baking. Tomorrow, I'll share an old Lenten recipe from my Italian family. See you then!